

Master transducer placement for crystal-clear sonar, side imaging, and forward-facing views — even at speed. Written for bass anglers who want reliable performance on the water.
Why Proper Transducer Installation Matters for Bass Anglers
A poorly installed transducer is one of the most common frustrations on the water. You lose bottom lock at speed, see streaks of noise or bubbles on side imaging, or miss that subtle brush pile or ledge because the signal is garbled.
On a bass boat — with its planing hull, outboard power, jackplate, and often a bow-mounted trolling motor — the challenges are unique. You run fast to the next spot, then slow down or idle to fish. You need the transducer to deliver clean data in both scenarios.
A correct installation gives you:
- Solid bottom tracking at 30–40+ mph
- Clear side and down imaging of structure and fish
- Reliable forward-facing sonar (LiveScope, ActiveTarget, etc.) when casting from the bow
- Longer equipment life and fewer headaches
This guide walks you through the best methods used by serious bass anglers, with practical steps you can follow yourself.
Types of Transducers and Best Mounting Options for Bass Boats
Bass boats typically use one (or a combination) of these approaches:
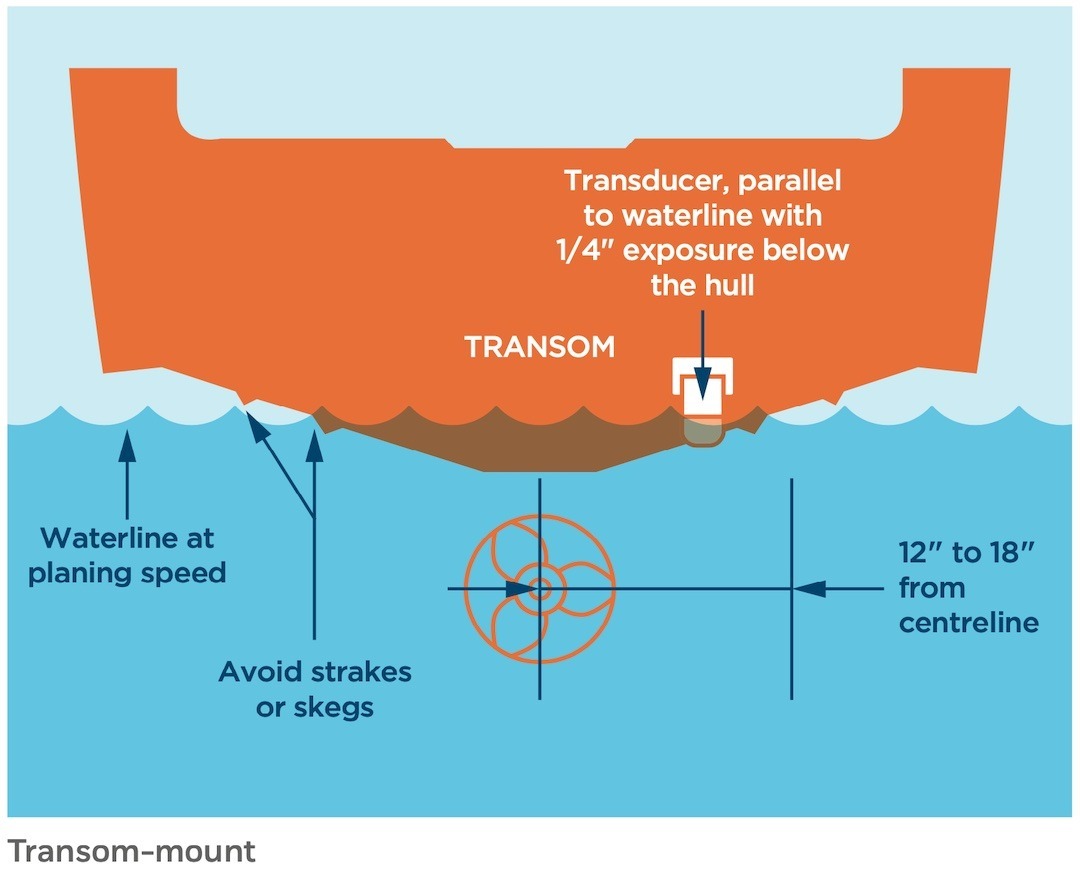
1. Transom-Mount (Skimmer) Transducer The most common traditional setup. Mounts on the transom and works well for 2D sonar and some imaging. Best results below ~34 mph when placed correctly.
2. Jackplate Mount Extremely popular on bass boats. The transducer mounts to the side of the jackplate. Advantages: adjustable height with the jackplate, better protection from some impacts, and often cleaner water flow. Many use dedicated brackets (Transducer Shield & Saver, BFE, etc.).
3. Trolling Motor Mount Ideal for forward-facing sonar and bow fishing. Mounts on the trolling motor shaft or lower unit. Gives you a view directly ahead of the boat — perfect when casting to targets.
4. In-Hull / Shoot-Through Hull A puck epoxied inside the bilge (fiberglass hulls only). Excellent for traditional 2D sonar while on plane because it avoids all turbulence. Limited imaging capability.
Pro Tip: Many tournament anglers run a dual setup — jackplate or transom transducer for rear/side imaging + trolling motor transducer for forward scan.
Tools and Materials You’ll Need
- Quality marine sealant (3M 4200, Sikaflex 295 UV, or similar — avoid permanent 5200 if you might need to remove it later)
- Stainless steel screws and hardware
- Mounting plate (Starboard/HDPE or expanded PVC) — highly recommended
- Drill, drill bits, and painter’s tape (to mark depth)
- Countersink bit or chamfer tool
- Framing square or long straightedge + level
- Cable ties, clips, and grommets
- Transducer bracket (or jackplate-specific mount)
- Wrenches/screwdrivers (hand-tighten whenever possible)
- Optional but smart: Transducer saver/shield, anti-seize for stainless hardware
At Egret Marine, we carry transducer mounting brackets (including Garmin and Humminbird transom brackets), marine hardware, and accessories that make professional-looking installs easier and more secure.
Safety Precautions Before You Start
- Disconnect the boat batteries before any wiring work.
- Wear eye protection and gloves.
- Work in a well-ventilated area when using sealants.
- Double-check your transducer and fishfinder manuals for model-specific instructions.
- If you’re uncomfortable drilling into the hull or routing cables, consider a professional marine electronics installer.
Step-by-Step: Transom-Mount Installation (Using a Mounting Plate)
This is the most universal method and minimizes permanent holes in your transom.
-
Choose and Mark the Location
- Starboard side is usually best for clockwise-rotating props (most outboards).
- At least 15 inches (38 cm) from the propeller.
- As close to the centerline as possible while staying clear of strakes, chines, rivets, drains, and the jackplate.
- The transducer should sit where it gets clean water flow.
- Install the Mounting Plate Mark two holes. Drill pilot holes carefully (use tape on the bit to control depth; drill in reverse on gelcoat to prevent cracking). Apply generous marine sealant to the screws and back of the plate. Secure the plate to the transom.
- Attach the Transducer Bracket Bolt or screw the bracket to the mounting plate. Hand-tighten.
-
Position the Transducer
- The face should be parallel to the waterline (or very slight nose-up adjustment).
- Bottom of the transducer should be approximately 1/8 inch below the hull on fiberglass or 3/8 inch on aluminum when the boat is loaded normally.
- Use a framing square against a known horizontal line (jackplate bottom, waterline stripe, etc.) to confirm level.
- Secure and Seal Everything Apply sealant around all screws and the bracket base. Let it cure fully before launching.
- Route the Cable Plan the shortest, cleanest route to your fishfinder head unit. Use existing holes when possible or drill a new one with a grommet + sealant. Secure the cable every 12–18 inches. Keep it away from power cables or cross them at 90 degrees if necessary. Leave a little slack at the transducer for vibration.
- Connect and Test Connect to your display unit, power on, and select the correct transducer settings in the menu.
Jackplate Mount Installation (Popular Bass Boat Option)
Many anglers prefer this because:
- The jackplate raises/lowers the transducer with the motor.
- It often provides cleaner water and some physical protection.
- Minimal or no drilling into the hull.
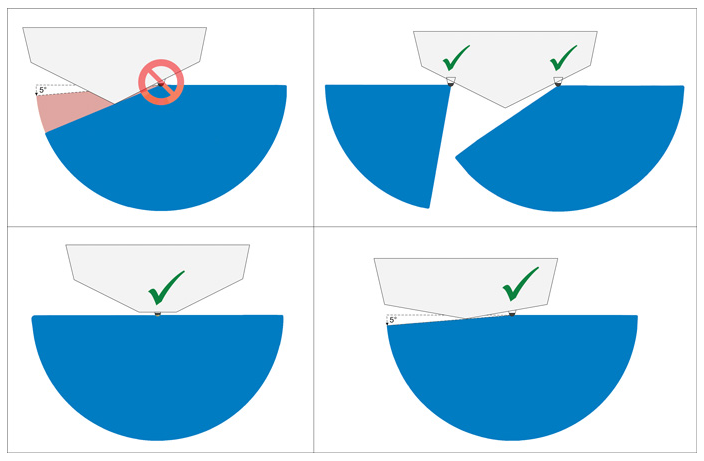
Use a dedicated jackplate bracket designed for your transducer model and jackplate brand/size. Position the transducer on the side of the jackplate so it stays submerged at the depths you fish but clears when the jackplate is fully raised. Slight upward angle on the rear of the transducer often helps imaging.
Trolling Motor Transducer Mount
Great for forward-facing sonar. Use the manufacturer’s shaft mount or a quality aftermarket clamp system. Pay close attention to propeller clearance when the trolling motor is stowed or racked. Test the position before final tightening — the transducer should have an unobstructed view forward.
Testing and Fine-Tuning
Launch the boat and test in this order:
- Idle / low speed
- Cruising speed
- On plane at your typical running speed
Watch for:
- Solid bottom lock
- Minimal noise or “snow” on the screen
- Clean side-imaging returns
- No excessive rooster tail or spray from the transducer itself
Adjustment tips:
- Losing bottom at speed? Lower the transducer slightly (⅛" increments) or tilt the tail down a few degrees.
- Too much turbulence or bubbles? Raise it slightly or adjust angle.
- Most quality brackets allow easy tilt adjustments without removing screws.
Common Mistakes to Avoid
- Mounting too close to the propeller or in prop wash
- Placing it behind strakes, chines, or drains that create bubbles
- Tilting the transducer nose-down (creates its own turbulence)
- Drilling too many holes instead of using a mounting plate
- Using non-marine sealant or hardware
- Poor cable routing (chafing, sharp bends, or interference)
- Not testing at actual fishing speeds before calling it done
Maintenance and Longevity
- Clean the transducer face regularly with a soft cloth and mild soap (never abrasives).
- Inspect mounting hardware and sealant annually.
- Check cable for chafing or damage.
- When trailering, consider a transducer saver or remove the unit if it’s vulnerable.
- In winter, protect or remove electronics as recommended by the manufacturer.
Troubleshooting
No depth reading or weak signal Check power, connections, transducer selection in the menu, and that the face is fully submerged and clean.
Interference or noise Reroute cable away from other electronics. Check for other transducers running on the same frequency.
Losing bottom or poor imaging at speed Revisit location, height, and angle. A mounting plate makes adjustments much easier.
Frequently Asked Questions
Do I have to drill holes in my boat? A mounting plate or jackplate mount greatly reduces or eliminates hull penetrations.
Which side is best? Starboard side for most single-outboard bass boats with clockwise props.
Can I do this myself? Yes, if you’re comfortable with basic tools and careful work. Many anglers install their own successfully.
Should I get a professional install? Worth considering for complex dual setups, warranty concerns, or if you want it done perfectly the first time.
Ready to Upgrade Your Sonar Setup?
A properly installed transducer transforms how you see the water. Whether you’re running traditional 2D, side imaging, or the latest forward-facing live sonar, the right mount and careful installation make all the difference.
At Egret Marine, we stock quality transducer brackets (Garmin, Humminbird, and more), marine sealants, mounting hardware, and accessories to help you get the job done right. We also carry related electronics and boat outfitting products to keep your bass boat performing at its best.
Shop transducer mounts and marine accessories at EgretMarine.com — free shipping on orders over $150.
Have questions about your specific boat or fishfinder model? Reach out to our team. We’re happy to help fellow anglers get the clearest picture possible on the water.
Safe boating and tight lines!
Related Reading from Egret Marine:
This guide is for informational purposes. Always follow your transducer and fishfinder manufacturer’s instructions. Results can vary by boat model, hull design, and conditions.